DEMO: Sugar Skulls
Sugar skulls are one traditional and crafty part of the traditional Mexican celebration, Dias de los Muertos, or Days of the Dead. During this time - usually celebrated from October 31 to November 2nd (depending on the part of Mexico) and adapted from ancient Aztec rituals and the Catholic celebrations of All Saints' Day and All Souls' Day - families and communities put up "ofrendas" or altars to honor and celebrate the dearly departed who come and visit. The sugar skulls are decorated, and often inscribed on the forehead with the name of the recipient - who can be either living or dead! They might be placed on the ofrenda, or given as a gift.
I learned how to make sugar skulls last year from Cathy of Bossa Nova Baby - and you can check out my post about it here! She didn't teach it this year, and I've been getting ready for a Sugar Skull Decorating party this weekend, so I thought I'd share the recipes and directions with you! It might be a bit late to prepare for this year, but you can get all the supplies you need for next year on this website, www.mexicansugarskull.com. If you're local to Portland, OR, you can get the supplies at The Decorette Shop and at Global Exchange (they carry the molds!). Global Exchange also has stores in San Francisco and Berkeley.
Materials
To cast the skulls:
- Sugar skull molds, like those from MexicanSugarSkull.com Trim the molds so each piece is individual and has a 1" plastic border. Skulls come in small one-part molds, as well as medium and large two-part molds.
- 5 lbs granulated sugar
- 1/4 cup meringue powder (available from cake decorating stores)
- 10 teaspoons water
- Cardboard squares slightly larger than the size of the trimmed molds you're using
Royal Icing
- 2 lbs powdered sugar
- 1/2 cup meringue powder
- 2/3 cup water
- Concentrated food coloring paste (like that found at cake decorating shops)
- Sequins, Tiny Paper Flowers, Metallic Leaves, Googly Eyes, Acrylic Gems, Thin Paper Foil, other small sparkly bits - again, many available at craft supply stores or cake decorating stores
- Cake decorating tips and icing bags
Instructions

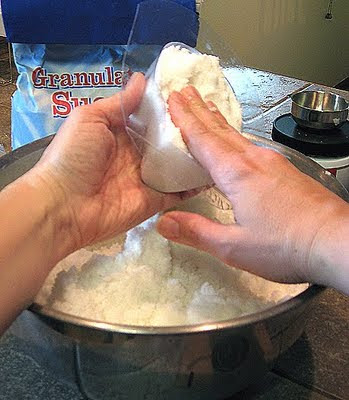
1. Mix the ingredients together for the sugar skulls - water, granulated sugar, meringue powder as listed above. Use your hands to evenly distribute the water throughout
the sugar. The sugar should feel like beach sand, and if you press your fingers into it, it should leave a clear impression. It won't feel wet.


If it cracks, you may not have enough water - dump it back in and lightly mist the sugar mixture.
If it sticks to the mold, you have too much water in the sugar. Try mixing it more.

Drying time will vary depending on the size of the mold and the ambient humidity.

6. Even after 12 hours, medium and large skulls will not be dry all the way
through. You will want to hollow them out, but leave at least a 1/2 inch wall thickness
and don't scoop into the neck area. Scoop out the moist sugar - it can be reused.
Now let them finish drying - another 5-12 hours.


both halves of the two-part skull. Put the rest in an airtight container, but do not refrigerate it.

icing that oozes out. Let it dry another few hours. This kind of icing dries like cement -
it's the same kind that is used to put together gingerbread houses.

with concentrated food coloring to color it. Put each color in its own icing bag. I like to use #2 round tips to get a clean precise line for decorating. Again, this stuff will dry really hard!

11. And you can use the icing almost like glue to attach googly eyes, sequins,
foil, or little paper flowers as part of your decoration.
Edited to add: You can also use this same process to make and decorate things like easter eggs or holiday trees! All you need is the right 3-D candy mold! Locally, check out the Decorette Shop for molds you like or just google "candy molds 3D" and you'll get more results - and ideas - than you'll know what to do with!


