Saturday, November 28, 2009

DEMO: Matchbox Advent Calendar

Just barely in time for the lovely month of December, I'd love to share an advent calendar project idea . . . For those of you growing up in Christian households, the advent calendar is used to count down the days until Christmas.


In this version, each of the days 'til Christmas is a little matchbox drawer opening up to reveal a scene taken from a recycled holiday card. You could also hide candies or tiny gifts in the drawers - or even adapt this idea to create a countdown to some other special event, like a birthday or other holiday.

Materials:
review the directions before buying any new supplies - substitutions are always possible

25 matchboxes
A lightweight board 2" wide and 36"-37.5" long
Scraps of foam core
Xacto or craft knife
Gesso
Acrylic paint
Heavy white craft glue
Diamond Glaze or other sealant
Mod Podge
Number stickers for dates
Recycled greeting cards, other decorative stickers and holiday doo-dads
Paper clip
Glue gun

Directions:


1. Start with 25 matchboxes and a lightweight board at least 36" long and 2" wide.
(I used two pieces of 36" bass wood that I got at the hobby store. For strength,
I glued the two pieces on top of each other with wood glue, and clamped them together
as they dried.) You might choose to use foam core as your base, but it's likely that
the foam core will warp.


2. Take all the little drawers out of the matchboxes. Otherwise, they might
accidentally get glued in place.


3. Using a thick craft glue like Tacky Glue or Ultimate Craft Glue, glue the
matchbox cases to the board. (I like to use a toothpick to apply the glue, and then I
clamped the little cases to the board with mini plastic clamps so they'd attach
firmly to the board as they dried.) Clean up any glue that oozes out from under the boxes
as this may keep the boxes from sliding in and out smoothly.


With any luck it should look like this when you're done. My bottom
matchbox hung off the edge just a little bit because my board was a bit shorter than
all of the matchboxes added together.


4. I chose to add a special accent to the top using foam core. I traced around the
top and drew a star shape on the foam core.


5. And then I cut the shape out with an Xacto knife. You might decide to create a different shape, or add a shape to the bottom as well.


6. Then I used a toothpick to apply glue to the interior edge . . .


. . . and fit it around the top of the board, pressed flush to the back of the board. I was using 1/4" foam core, and my bass wood boards were each 1/8" thick, so my topper fit perfectly without blocking access to the top matchbox.


7. I glued a bit of paper to the back to strengthen the topper.


8. Now, once all your glue is dry, gesso the whole contraption in preparation for painting.


9. Now, coat with the color of your choice. I used two coats of red acrylic paint.
I didn't paint the inside of the matchbox cases because the paint can build up and make it
difficult to slide the drawers in and out. I left the insides of the cases
and the matchboxes themselves unpainted for this project.


10. I happen to have a crazy big collection of letter and number stickers that
I got on sale, so I used those to apply dates to my advent calendar - one date for each box.
If you don't have stickers, you can try painting the numbers on, or even cutting numbers out from an old calendar and gluing them on.


And then I used some cool metallic star stickers I found
to add a little pizazz!


11. Next, coat the calendar with Diamond Glaze or another easily
controlled acrylic for durability.


12. While it dries, start working on each of the individual drawers. I created a
template by trial and error, using an old holiday card that I wasn't super crazy about.
I created a form that would fit roughly inside the boxes.
After you've made a template, try laying it over cards, wrapping paper, or images you like
and start cutting them out.


13. After cutting an image out, fold up the corners so it will fit
inside the boxes like a liner. Test it out and trim as needed.


14. Next, coat the inside of the box with Mod Podge.


15. Press the liner into the box. And let it dry. You can also cut individual characters
out of the cards and use a bit of foam core to lift them up and give them some dimension in
the box. Use your heavy craft glue to attach the card stock to the foam core
and the foam core to the inside of the box.


16. Bend open a paperclip to create a hanging hook for the back. I used hot glue to attach
the hook to the back, but Goop or E6000 or even duct tape could probably be
used to attach a hook of some kind to the back.


Each little drawer can be completely different, or they can come together to tell a story
as the month goes on and the drawers are opened one by one. Note: As you are preparing your drawers, consider that having them all open on one side will probably cause the calendar to tilt. Also remember that you won't be able to leave the drawers open completely and have them stay in the calendar. The entire image inside the box probably won't be visible all the time, so adjust your compositions accordingly. Try having the drawers alternate which side they slide open on.

Here, you can see it hanging in my entry way - with the little drawers closed, and then with
several of them open!

If you try making one of these for the holidays or for some other ocassion, I'd love to see it!

Monday, November 23, 2009

Recipe: Pumpkin Pie Oatmeal

Oatmeal is my favorite winter breakfast food and pumpkin pie is one of my all-time favorite desserts. This recipe brings them both together in a completely yummy and wonderful way, with a texture almost like really good bread pudding. I love it warm from the oven and topped with baked apples. And it's low on the sugar and the butter, and high in fiber, so I like to pretend it's super healthy, too!


Ingredients

Dry:
2 cups regular, not quick, oats
5 tablespoons brown sugar
1/2 teaspoon salt
Pumpkin pie spice

Wet:
1 teaspoon vanilla
1 can pumpkin puree
1 and 1/2 cups milk or soy milk
4 teaspoons butter, melted

Topping:
1/2 cup pecans
4 teaspoons butter
2 tablespoons brown sugar


To Make

  1. Preheat oven to 375 degrees
  2. Mix dry ingredients
  3. Mix wet ingredients
  4. Pour wet ingredients into dry and mix
  5. Pour into greased 9 x 12 pan. Bake for 10 minutes.
  6. While it's baking, mix the topping together ingredients together and melt in the microwave. After the 10 minutes is up, add the topping. (You can also just leave it on the side)
  7. Bake another 7 minutes with the topping.
For an extra treat, slice up 4 or 5 granny smith apples, mix them with some brown sugar and cinnamon, top with a little butter and pop them them in the oven at 375 until they're tender. Served on top of the pumpkin pie oatmeal, it's amazing!

Credit where credit is due: This recipe is my reinterpretation of a recipe I found over here at Katie Goodman's site Goodlife Eats . . . http://www.goodlifeeats.com/2009/09/pumpkin-pie-oatmeal.html . . . If you like it be sure to pop over and give Katie Goodman some love!

Wednesday, November 11, 2009

The Last Free Knittn' Kitten Project: It's all about the Doilies

I wish I could crochet.

But I can't. I've tried to learn, and someday, I will, but it's just not happening right now.

I did get this amazing book by Linda Permann called Crochet Adorned - which is just chock full of the most amazing ways to incorporate crochet into pre-made garments as embellishments - and by following her instructions - which are very good - I managed to do a chain stitch. And I started trying to crochet into it. That pitiful little chain has sat ignored now for at least two months.


What happened next is that I picked up Generation T: Beyond Fashion by Megan Nicolay after a trip to the Knittn' Kitten (Portland's own crafty thrift store - I go on about it in depth here) and had an incredible brainstorm - a way to make myself a scarf that incorporated crochet - totally recycled, and without crocheting a stitch myself!

Doilies my friend, the answer is doilies.

And the result is this nifty doily scarf made from crocheted doilies from the Knittn' Kitten and a bunch of old t-shirts.


And yes, you can learn how to make it by dropping by the Knittn' Kitten and picking up the free project sheet - and while you're there, you can buy a few doilies or other other lacy tidbits and maybe some knit fabric at incredibly low prices. Ethel, one of the owners, showed me some knit velvet and velours that I think would work very nicely for this project . . .

Of course, the project sheet has a few bonuses - 'cause, well, doilies are just utterly inspirational. See, you can use them as stencils. . .

How could I resist?

And, if you missed the other free project sheets available at your favorite local crafty thrift store, it's not too late! I was in the other day picking up a few things . . . and found project sheets for all the projects to date (I picked up Sister Diane's tea towel pattern) - as well as some nifty beads and baubles:


For those of you who are just dying for all seven of the amazing Knittn' Kitten tutorials from such local luminaries as Heather Mann of DollarStoreCrafts, Teresa Sullivan, Diane Gilleland of CraftyPod, Joey Groendes, Christine Blystone, Susan Beal, Lee Meredith, and well, me, but don't live in town - you're in luck! Towards the end of November, all of these projects will be available as an e-Book from Sister Diane.

Or, if you're in a hurry for the crafty goodness, check out the e-Book Crafty Tree Trimmings - it's another collaborative of crafty instructions benefiting a good cause - 15% of sales go to Project Linus!

Thursday, November 5, 2009

More fun with Plastic . . .

Once again, I'm throwing myself out there and making more stuff out of reclaimed plastic. I joined up with the latest episode of Leave No Plastic Behind's art challenge, and have been saving large swathes of the plastics I consume . . . plastic bags, plastic bottle caps, bags from frozen foods, straws, lids, clamshells, candy wrappers, tub lids . . . fact is, I produce a lot more plastic than I ever thought I did.

The challenge, of course, is two-fold: one, to make art from the plastics and two, to change your habits so you don't use as much plastic. Let's just say I'm doing really well on the first, and struggling with the second . . .

I found this great tutorial on Etsy for fusing plastic bags. I had plastic bags from my trip to Mexico last year, from frozen veggies, from the Food Day newspaper that gets delivered whether I want it or not . . . So I fused them (with good ventilation, of course) and created squares . . . which I stitched up into this cool quilt square!


Of course, I'm still working with my first love in the world of reclaimed plastics, plastic bottle caps. I made another chandelier, this one for Tribute Gallery in NW Portland:


And, thanks to some friends, I've discovered more artists and creative folks out there making great stuff out of reclaimed plastics . . .


This amazing image of a curtain made of plastic bottlecaps was sent to me by Alea over at Bonewerx - to see more, check out the Dutch wiki the images came from!

And then there's this installation at Rice University by Aurora Robson (photo by Nash Baker) called "The Great Indoors" made entirely of reclaimed plastics . . .those dark curly lines? All bottlecaps!!

Monday, November 2, 2009

Dia de los Muertos: Eye Candy and Sugar Skulls

A little eye candy from my Day of the Dead art making adventures . . .


A couple of ATC's I made for a Day of the Dead themed
swap on Swap Bot . . . with pictures that I took in Oaxaca last year.


The ofrenda or altar I made for my home . . . a place to honor
my late father and grandparents, and the late loved ones of my guests.


and here's me dressed as a Frida Kahlo calavera . . .


for the Day of the Dead procession and last Thursday
art opening on NE Alberta.


Friends came over on Dia de los Muertos to decorate sugar skulls . . .


Here are some of the results of our efforts . . .


I'm lovin' the creativity . . .


Check out the rose gripped in her teeth!


And this one still in process . . .

It's a wonderful holiday that allows us to honor our loved ones who have
passed and be so creative all at the same time!

Saturday, October 31, 2009

DEMO: Sugar Skulls for Day of the Dead

DEMO: Sugar Skulls


Sugar skulls are one traditional and crafty part of the traditional Mexican celebration, Dias de los Muertos, or Days of the Dead. During this time - usually celebrated from October 31 to November 2nd (depending on the part of Mexico) and adapted from ancient Aztec rituals and the Catholic celebrations of All Saints' Day and All Souls' Day - families and communities put up "ofrendas" or altars to honor and celebrate the dearly departed who come and visit. The sugar skulls are decorated, and often inscribed on the forehead with the name of the recipient - who can be either living or dead! They might be placed on the ofrenda, or given as a gift.

I learned how to make sugar skulls last year from Cathy of Bossa Nova Baby - and you can check out my post about it here! She didn't teach it this year, and I've been getting ready for a Sugar Skull Decorating party this weekend, so I thought I'd share the recipes and directions with you! It might be a bit late to prepare for this year, but you can get all the supplies you need for next year on this website, www.mexicansugarskull.com. If you're local to Portland, OR, you can get the supplies at The Decorette Shop and at Global Exchange (they carry the molds!). Global Exchange also has stores in San Francisco and Berkeley.

Materials

To cast the skulls:

  • Sugar skull molds, like those from MexicanSugarSkull.com Trim the molds so each piece is individual and has a 1" plastic border. Skulls come in small one-part molds, as well as medium and large two-part molds.
  • 5 lbs granulated sugar
  • 1/4 cup meringue powder (available from cake decorating stores)
  • 10 teaspoons water
  • Cardboard squares slightly larger than the size of the trimmed molds you're using
To decorate the skulls:

Royal Icing
  • 2 lbs powdered sugar
  • 1/2 cup meringue powder
  • 2/3 cup water
  • Concentrated food coloring paste (like that found at cake decorating shops)
Additional Decorating Materials
  • Sequins, Tiny Paper Flowers, Metallic Leaves, Googly Eyes, Acrylic Gems, Thin Paper Foil, other small sparkly bits - again, many available at craft supply stores or cake decorating stores
  • Cake decorating tips and icing bags

Instructions


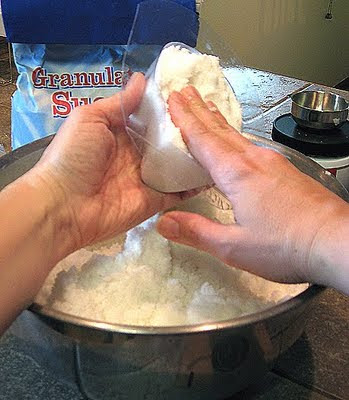
1. Mix the ingredients together for the sugar skulls - water, granulated sugar, meringue powder as listed above. Use your hands to evenly distribute the water throughout
the sugar. The sugar should feel like beach sand, and if you press your fingers into it, it should leave a clear impression. It won't feel wet.

2. Press the sugar into the trimmed mold. Press firmly. Fill it over the top.


3. Scrape off the excess - leave the back flat.


4. Lay the cardboard over the back of the mold, and flip it over. Gently lift the mold off.
If it cracks, you may not have enough water - dump it back in and lightly mist the sugar mixture.
If it sticks to the mold, you have too much water in the sugar. Try mixing it more.


5. Let the skull dry on the cardboard for 5-12 hours, or until it's hard to the touch.
Drying time will vary depending on the size of the mold and the ambient humidity.


6. Even after 12 hours, medium and large skulls will not be dry all the way
through. You will want to hollow them out, but leave at least a 1/2 inch wall thickness
and don't scoop into the neck area. Scoop out the moist sugar - it can be reused.
Now let them finish drying - another 5-12 hours.


7. Once both parts of the two-part skulls are dry, they will need to be "glued" together. Now it's time to mix up your Royal Icing! Blend the ingredients together and use an electric mixer at high speed to mix them together thoroughly. You will want to mix the icing until the icing holds firm peaks - 5 to 10 minutes.


8. Put a 1/2 cup or so of royal icing in a pastry tube and squeeze a bead of icing onto
both halves of the two-part skull. Put the rest in an airtight container, but do not refrigerate it.


9. Squeeze both halves of the skull together. Wipe away any excess
icing that oozes out. Let it dry another few hours. This kind of icing dries like cement -
it's the same kind that is used to put together gingerbread houses.


10. Now, you're ready to decorate! You can mix icing together
with concentrated food coloring to color it. Put each color in its own icing bag. I like to use #2 round tips to get a clean precise line for decorating. Again, this stuff will dry really hard!


11. And you can use the icing almost like glue to attach googly eyes, sequins,
foil, or little paper flowers as part of your decoration.


You can save these from year to year - though they last better in dry climates than in humid ones. And, if you stick to using only edible ornaments - just icing and cake decorating gems - they are edible! Enjoy!

Edited to add: You can also use this same process to make and decorate things like easter eggs or holiday trees! All you need is the right 3-D candy mold! Locally, check out the Decorette Shop for molds you like or just google "candy molds 3D" and you'll get more results - and ideas - than you'll know what to do with!

ShareThis