Monday, December 22, 2008

Snow Daze.

When Portland gets snow it usually lasts a day, throws the whole city into a tizzy, and then leaves in a little moist whiff leaving barely a memory of itself behind. Not so this time. The snow has been here for over a week, and it's just getting deeper!


Here's the drift in my backyard. It has made exiting through the rear sliding glass doors almost impossible. Darren, however, did make it up the drift to refill the bird feeders.


Which I must say is very good for this guy! I love how when it gets cold, the birds all fluff up their under feathers. It makes them look so sweet and round . . . like Japanese brush drawings.


I was beginning to get a bit of cabin fever, but then I remembered . . . I have snowshoes! Darren got a few shots of me frolicking in the front yard before we trekked down to the grocery store.


So here's me making crazy deep footprints in my front yard yesterday with my big foot snowshoes.

And here's the front yard this morning. As pristine as if I'd never walked on it at all! The snow just doesn't seem to be going away . . .

So, when life gives you snow, make snow angels!

Tuesday, December 16, 2008

DEMO! Matchbox Ornament

If the Portland Saturday Market can have a Festival of the Last Minute, so can I! So here goes the first Ornament Demo of this year's Festival, for all my fellow decorating procrastinators and snowbound crafters!


For the big Cake and Pie Ornament Swap, I turned matchboxes into little birdhouses . . . and here's the Demo to prove it . . .


1. Start with matchboxes - and open up the outer part. Punch a 7/8" hole in the front, and gesso those babies! My 7/8" punch was so big that I had to open them up to punch them - but you may not have to open them up with a smaller punch . . .

2. Put two layers of gesso on . . .


3. Now glue the outsides back together - I used Crafter's Pick Ultimate Glue, but Aleene's Tacky Glue would also work well. I used paper clips to hold the parts together while they were drying.


Ok, I love this paperclip shot,so you get a little extra.

4. Get some green acrylic paint, and paint the outside.

5. I gessoed the interior boxes, but you don't really need to. I do, however, recommend taking your 1/16" hole punch and punching holes in one end . . .


6. This will make it easier to poke the brads through, making a little drawer pull for the box.


7. Because I was doing multiples, I made one collage with some hand drawn birds and photocopied it. I starting by making a little template based on the inside of the matchbox. Then, I blew it up 200%, made my drawing/collage (I used shredded paper to make the nest), and then photocopied it again at 49%!

8. I used the template to trim the image to the perfect size, and folded it so it would fit.


9. I coated the inside of the box with matte medium . . .

10. And pressed the paper in. I used extra matte medium where the brad was so that the paper would adhere properly.


11. Next, it was time for the little surprise! I had also photocopied little gifts. I cut out tiny bits of foam core . . .


12. . . . And glued it down. I used Beacon's 3-in-1 just because it was handy, and it comes out of the bottle easily. You could use any craft glue.


13. Then, another dab of glue, and the little present is right there in 3D!


14. I made a little roof template and traced it out on some red posterboard I had.


Action shot!

15. Here you can see how it folds to make a little roof!

16. Where the roof tab overlaps, I slipped in a bit of ribbon to create a hanger. I used Ultimate Glue to secure it . . .


17. . . . And a paperclip to hold it while it dried.


18. I applied glue to the back of the roof piece . . .

19. I slipped it inside the exterior cover and held it in place while it set.


20. Poof! It's a little birdhouse, with a birds and nest inside! I also painted the top of the interior box red to match the roof, cause I was just being, well, you know, like that.

21. And still, it seemed like it needed a little more . . . so I added some Elmer's . . .

22. And some antique style mica glitter. You can also add a little on the roof for an extra accent.


And you're done!

Hope you're having a great holiday season.

Monday, December 15, 2008

Walking in a Crafty Wonderland . . .

Part of why I love Portland, Oregon is that for 11 months out of the year, the temperature hovers between 50 and 80 degrees. Warm enough for sandals and sundresses in the summer; cool enough for boots and sweaters in the winter. Only rarely do we swelter, and only rarely do we get snow or below freezing temperatures.

Rarely.

Which is not the same as never.

This year, one of our allotted two weeks of real winter weather just happened to coincide with the big holiday Crafty Wonderland event. And I have to say, people of Portland, I am impressed. In spite of a strong discomfort with icky weather, about 3000 people wandered through the event at the Oregon Convention Center . . .and some of them even bought stuff from me! Cool! Er, below freezing, really.


Here's my silly display of buttons and bauble rings . . .


It was a good day. Loading up to go home, I noticed my tire was a little low. I still managed to get my chains on - a very proud moment for me!

And the next day, it was almost completely flat. It's still kind of a cool picture, though, eh?

Saturday, December 13, 2008

The Crafting Frenzy . . .

Most of the week has been spent making jewelry for Crafty Wonderland on Sunday . . .


Like these memory jewelry pendants with bird collages . . . I still need to add beads on some of them.


And these recycled rubber bicycle inner tube bracelets . . . a few of them are printed with my own designs like an octopus . . . and another with a tree . . . I've been doing some of my own drawings and getting rubber stamps made of them. I'm also using a few stamps from angel companies - those that allow you to hand-stamp items using their images and sell them. I think a few of these may need some metal studs to finish them out.

I'm excited to see what kind of response I get - it's been a long time since I've done a big craft show! Cross your fingers for me!

Friday, December 12, 2008

Ornament Swap: Why I Love the Mail

After seeing the lovely ornament that Claudia made last year for the Cake and Pie holiday ornament swap, I felt inspired to participate this year . . . I've never done a swap before, so I was a little nervous, but I'm loving it so far!

Why?

Because people are sending me cool things in the mail!! I love the mail. I love to go and check my PO Box. I get movies by mail. I get books by mail. My sweetie's Dad has a good job working for the Post Office, and that just makes me love the mail even more. I love getting things in the mail, and my family, with a few notable exceptions, are not big on sending holiday cards or gifts. Sadly, most of my holiday mail can be divided into two categories: catalogs and requests for charitable donations. This is the first year in a long time that my mailbox has been full of holiday goodness and surprises!


These are the first three ornaments I got . . . I am particularly fond of the gingerbread cat! And I'm amazed at the sturdiness of the glimmery glass ball - it made the trip in a padded envelope and survived intact! See? The mail is good.


Today, there were more wonderful surprises! A sweet owl ornament in a mushroom-decorated envelope from the UK, and an amazing mushroom ornament with a snowy forest card from Washington State! It's like fate! It's a woodland fairytale match made in heaven! And, crazily enough, the card from the UK made it here without a stamp . . . perhaps it was elves? Or, just more evidence that the mail is good.

(You'll have to wait to see the ornament I made, 'cause I'm working on a tutorial for next week's Last Minute Holiday Madness Event.)

Speaking of great mail, Sister Diane and Brother K. sent me one of their Holiday Zines!! As far as I am concerned, this means I must be on Santa's list of good girls this year.


And if you want one, I think there are still a few on sale over at their shop . . . my favorite part is the strangely fruitcake-free holiday disaster calendar centerfold.

Thursday, December 11, 2008

Making Memory Jewelry . . .

I got the chance last week to teach not one, but two Memory Jewelry classes! One of them was my regularly scheduled one, and another was a custom one for a friend of mine . . . It's a great class to teach this time of year because everyone's working on gifts . . . making ornaments with pictures of their dogs and jewelry for their relatives . . . most of which I didn't photograph! But I did get a few great shots to share with you . . .


Wednesday, December 10, 2008

Geekery and Knitting and Crochet

I think I've made it pretty clear that I'm a big geek. The Sweetie and are in the process of watching all the X-Files episodes, season by season, start to finish. So, it is no surprise that I'm a big fan of Joss Whedon, the guy who's behind Buffy the Vampire Slayer (yes, I own the entire series), Firefly, and now, Dr. Horrible's Sing-A-Long Blog. And all my fellow crafty geeks are well aware that the knitted hat (complete with pom-pom and earflaps) that Jayne recieved from his mother in the Firefly episode "The Message" may well be the most re-crafted geek knitwear item on the interwebs - and here's a pattern and blog post to prove it. (Of course, in terms of longevity - as opposed to current popularity - we must give props to Dr. Who's scarf - it even has its own website).

So, you can imagine how delighted I was to see this interview with Joss (via Craftzine) in which he not only proposes that Underworld was originally about the epic knit vs. crochet battle, but that it was abandoned to tell the less controversial tale of the vampire vs. werewolf conflict, he also offers up some very compelling advice:

"So I think that ultimately, my advice is what my advice always is: Make stuff." - Joss Whedon, in an interview on CrochetMe.
Read the whole interview for more geeky goodness.

And if you're really wondering if knitting is as dangerous as, say, vampires, werewolves, or international terrorists, be sure to check out this video from the Colbert Report - which I found via Extreme Craft. (I've tried to embed the video and it didn't work yet, so just click on one of the links to see the video).

Thursday, December 4, 2008

It's Really the Holidays Now!

It really starts to feel like the holidays for me right after Thanksgiving. My grandmother always used to take the turkey carcass and make turkey soup, and it's a tradition I carry on - right down to the Tabasco! Something about the soup bubbling on the stove says, "Yup. It's really the Holidays now!"


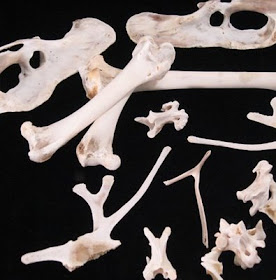
Of course, the thing I do that my grandmother never did is save the bones and use them in art.


In a previous post, someone asked about preparing the bones. I'm still in the process of perfecting my technique - and I have to admit that I would love to have a box of flesh eating beetles (like they use on Bones) for Christmas! But, for now, I'll just give you a quick description of how I do it . . . and if you've got any suggestions, let me know!

  1. Boil the turkey - this helps get the flesh off the bones, and gives you a great broth. Be careful not to boil it for too long, though, as this can bring the yellow fats in bone to the surface and leave you with greasy bones - usually, I bring it to a boil, then let it simmer.
  2. Run cool water over the bones and clean the last of the meat and flesh off with your fingers.
  3. Mix about a cup of bleach in one or two gallons of water and let the bones soak in it for a few hours. Remove, rinse, and let the bones air dry. Again, I'm still working this out . . . if there's too much bleach, or you leave it in too long, it can make the bone brittle and powdery.
  4. Once the bones are dry, I seal them with a matte gel medium or a matte spray sealant. Then, they go in the art. Fun!